Gitleaks scanner reference for STO
You can scan your code repositories using Gitleaks, an open-source tool designed to find common security issues in Python code.
Gitleaks can publish results to Static Analysis Results Interchange Format (SARIF), an open data format supported by many scan tools.
For a description of the end-to-end workflow, go to Ingest SARIF data.
For more information
The following topics contain useful information for setting up scanner integrations in STO:
Gitleaks step settings for STO scans
The recommended workflow is to add a GitLeaks step to a Security Tests or CI Build stage and then configure it as described below.
Scan Mode
This integration supports the following orchestration modes.
- Ingestion Ingestion scans are not orchestrated. The Security step ingest results from a previous scan (for a scan run in an previous step) and then normallizes and compresses the results.
- Orchestrated A fully-orchestrated scan. A Security step in the Harness pipeline orchestrates a scan and then normalizes and compresses the results.
Scan Configuration
The predefined configuration to use for the scan. All scan steps have at least one configuration.
Target
Type
Repository Scan a codebase repo.
In most cases, you specify the codebase using a code repo connector that connects to the Git account or repository where your code is stored. For information, go to Create and configure a codebase.
Name
The Identifier that you want to assign to the target you’re scanning in the pipeline. Use a unique, descriptive name such as codebaseAlpha or jsmith/myalphaservice. Using descriptive target names will make it much easier to navigate your scan data in the STO UI.
Variant
An identifier for a specific variant to scan, such as the branch name or image tag. This identifier is used to differentiate or group results for a target. Harness maintains a historical trend for each variant.
You can see the target name, type, and variant in the Test Targets UI:

Workspace (repository)
The workspace path on the pod running the Security step. The workspace path is /harness by default.
You can override this if you want to scan only a subset of the workspace. For example, suppose the pipeline publishes artifacts to a subfolder /tmp/artifacts and you want to scan these artifacts only. In this case, you can specify the workspace path as /harness/tmp/artifacts.
Ingestion File
The results data file to use when running an Ingestion scan.
Generally an Ingestion scan consists of a scan step (to generate the data file) and an ingestion step (to ingest the data file).
In addition to ingesting scan data in the external scanner's native format, STO steps can also ingest data in SARIF and Harness Custom JSON format.
For more information, go to Ingest Scan Results into an STO Pipeline.
Log Level, CLI flags, and Fail on Severity
Log Level
The minimum severity of the messages you want to include in your scan logs. You can specify one of the following:
- DEBUG
- INFO
- WARNING
- ERROR
Additional CLI flags
You can use this field to customize the scan with specific command-line arguments supported by that scanner.
Fail on Severity
Every Security step has a Fail on Severity setting. If the scan finds any vulnerability with the specified severity level or higher, the pipeline fails automatically. You can specify one of the following:
CRITICALHIGHMEDIUMLOWINFONONE— Do not fail on severity
The YAML definition looks like this: fail_on_severity : critical # | high | medium | low | info | none
Settings
You can add a tool_args setting to run the Gitleaks scanner binary with specific command-line arguments. For example, you can redact secrets from the scanner output using -redact: tool_args : --redact
You can also use tool_args to speed up your Gitleaks scans.
Additional Configuration
In the Additional Configuration settings, you can use the following options:
Advanced settings
In the Advanced settings, you can use the following options:
Speeding up Gitleaks scans
A Gitleaks scan might take a long time if your repository is very large or has a long commit history. To speed up your scans, you can use the tool_args setting to run gitleaks detect with the following command-line option:
tool_args : --log-opts="-n 1000"You can use
--log-optsto narrow the range of commits that Gitleaks scans in a Pull Request. For example,-n 1000limits the scan to the last 1000 commits. You can also scan a range of commits using a command such as:tool_args : --log-opts=="--all commitA..commitF"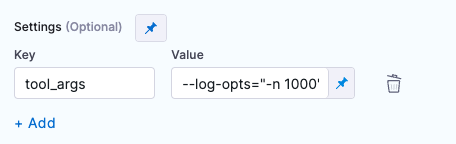
Gitleaks step configuration example for STO
Here's an example of a configured Gitleaks step.
- step:
    type: Gitleaks
    name: gitleaks
    identifier: gitleaks
    spec:
      mode: ingestion
      config: default
      target:
        name: nodegoat
        type: repository
        variant: dev
      advanced:
        log:
          level: debug
      ingestion:
        file: /path/of/file.sarif
    description: gitleaks step
Gitleaks ingestion pipeline example for STO
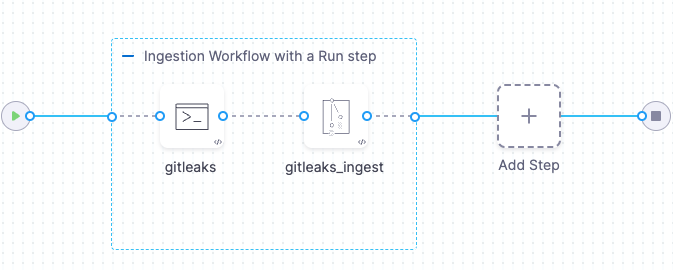
The following pipeline shows an end-to-end ingestion workflow. The pipeline consists of a Build stage with two steps:
A Run step that sends a
gitleaks detectcommand to the local Gitleaks container to scan the codebase specified for the pipeline. This command specifies the output file for the scan results:/shared/customer_artifacts/sarif_simple.sarif.A Gitleaks step that auto-detects the data file type (SARIF) and then ingests and normalizes the data from the output file.
pipeline:
  projectIdentifier: STO
  orgIdentifier: default
  tags: {}
  stages:
    - stage:
        name: gitleaks-build-stage
        identifier: gitleaksbuildstage
        type: CI
        spec:
          cloneCodebase: true
          execution:
            steps:
              - stepGroup:
                  name: Ingestion Workflow with a runs step
                  identifier: Generation
                  steps:
                    - step:
                        type: Run
                        name: gitleaks
                        identifier: Run_1
                        spec:
                          connectorRef: CONTAINER_IMAGE_REGISTRY_CONNECTOR
                          image: zricethezav/gitleaks:latest
                          shell: Sh
                          command: |
                            gitleaks detect --source /harness --report-path /shared/customer_artifacts/ingest-data.sarif --report-format 'sarif' --exit-code 0 --redact -v
                          resources:
                            limits:
                              memory: 2048Mi
                              cpu: 2000m
                        when:
                          stageStatus: Success
                    - step:
                        type: Gitleaks
                        name: gitleaks_ingest
                        identifier: gitleaks_ingest
                        spec:
                          mode: ingestion
                          config: default
                          target:
                            name: gitleaks-example
                            type: repository
                            variant: master
                          advanced:
                            log:
                              level: info
                          ingestion:
                            file: /shared/customer_artifacts/ingest-data.sarif
          sharedPaths:
            - /shared/customer_artifacts
          caching:
            enabled: false
            paths: []
          infrastructure:
            type: KubernetesDirect
            spec:
              connectorRef: K8S_DELEGATE_CONNECTOR
              namespace: harness-delegate-ng
              automountServiceAccountToken: true
              nodeSelector: {}
              os: Linux
  properties:
    ci:
      codebase:
        connectorRef: CODEBASE_CONNECTOR
        repoName: dvpwa
        build: <+input>
  identifier: Gitleaks_docsexample_INGESTION
  name: Gitleaks docs-example INGESTION
Gitleaks orchestration pipeline example for STO
The following pipeline illustrates an orchestration workflow where the Gitleaks step scans the codebase and ingests the results in one step.

pipeline:
  projectIdentifier: STO
  orgIdentifier: default
  tags: {}
  stages:
    - stage:
        name: gitleaks-build-stage
        identifier: gitleaksbuildstage
        type: CI
        spec:
          cloneCodebase: true
          execution:
            steps:
              - stepGroup:
                  name: "STO Orchestration "
                  identifier: Orchestration
                  steps:
                    - step:
                        type: Gitleaks
                        name: gitleaks_orch
                        identifier: gitleaks_orch
                        spec:
                          mode: orchestration
                          config: default
                          target:
                            name: gitleaks-example
                            type: repository
                            variant: master
                          advanced:
                            log:
                              level: info
                          settings:
                            tool_args: "--log-opts=\"-n 1000\"`"
                          resources:
                            limits:
                              memory: 2048Mi
                              cpu: 2000m
          sharedPaths:
            - /shared/customer_artifacts
          caching:
            enabled: false
            paths: []
          infrastructure:
            type: KubernetesDirect
            spec:
              connectorRef: K8S_DELEGATE_CONNECTOR
              namespace: harness-delegate-ng
              automountServiceAccountToken: true
              nodeSelector: {}
              os: Linux
  properties:
    ci:
      codebase:
        connectorRef: CODEBASE_CONNECTOR
        repoName: dvpwa
        build: <+input>
  identifier: gitleaks_docs_example_ORCHESTRATION
  name: gitleaks docs example - ORCHESTRATION